In Systems, draw cold and hot water, drains, heating flow and return, ducts and air conditioning lines, or let the editor lay a simple network from the source. Floor heating is set per room.
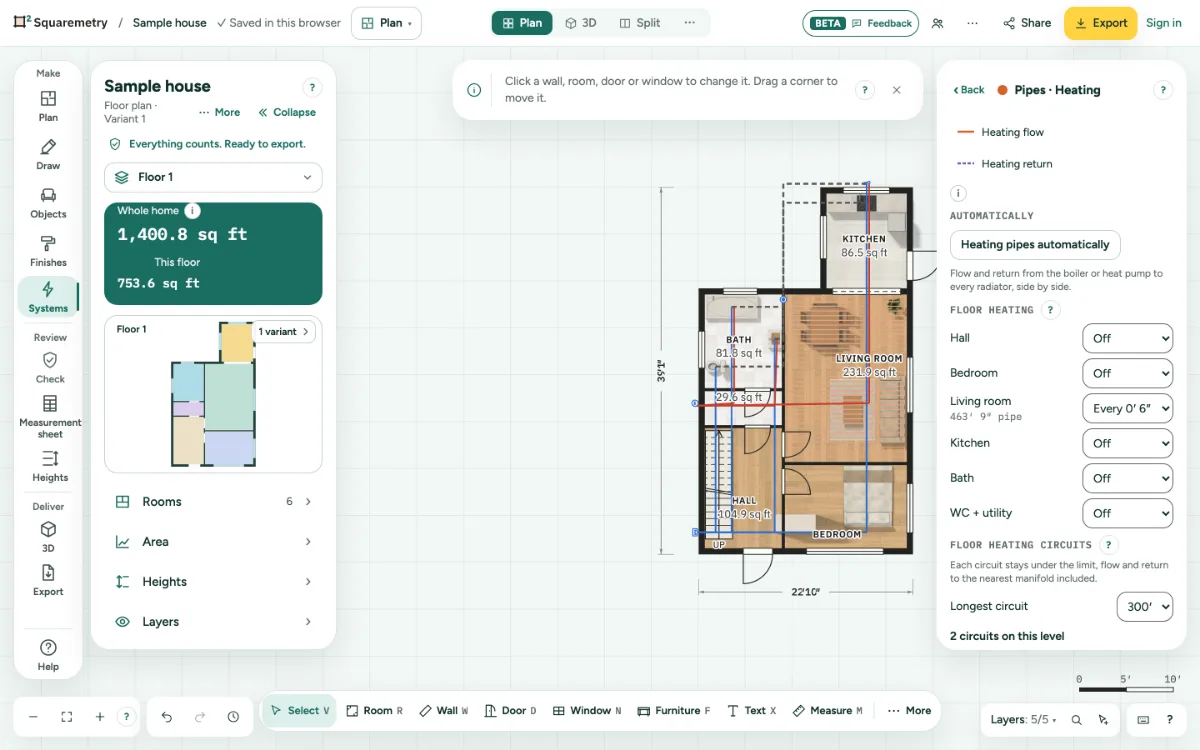
Pipes and ducts: water, drains, heating, floor heating and air: step by step
1. Draw a pipe
Open a trade, then Pipes, and pick a kind: Cold water, Hot water, Drain, Heating flow, Heating return, Supply duct, Extract duct, Refrigerant line or Condensate drain. Click point by point and finish with Enter, a double-click or a click on the last point. Each kind has its own colour and line, the same on the plan, in the legend and in 3D.
2. Water automatically
Place a water meter, a water heater or boiler, and taps or sanitary from the library. Click Water pipes automatically: cold runs from the meter, hot from the heater to every point that needs it, side by side. Without a water heater you get only cold water, and a message says so.
3. Drains
Place a soil stack and click Drains automatically. Every tap, floor drain, toilet, basin, shower, bath and washing machine gets a drain to the nearest stack.
4. Heating and air
With a boiler or heat pump and radiators, Heating pipes automatically lays flow and return. With a ventilation unit and vents, or an outdoor and indoor air conditioner, Ducts and lines automatically lays the ducts and refrigerant lines.
5. Again and undo
Laying a network again replaces the earlier automatic one of the same kinds; pipes you drew yourself stay. ⌘Z takes a whole network away in one step.
6. Floor heating
Open Heating, then Pipes, and set floor heating per room to every 10, 15 or 20 cm (US: 4, 6 or 8 inches), or Off. The room shows the loop on the plan, and the pipe length is the floor area divided by that spacing. A void, stairwell, lift, shaft, column or setback in the room has no floor: the loop goes around it and its area does not count.
7. Floor heating circuits
Place a manifold. Floor heating circuits then lists each circuit with its number, room and length: the pipe in the room plus flow and return to the nearest manifold. A room that does not fit under the Longest circuit (usually 100 m; US 300 ft; or 80 and 120 m) gets more circuits of equal length. Tips say when there is no manifold, when a room is too far away, or when a manifold has more than 12 circuits. Floor heating layout as PDF prints the layout: each circuit in its own colour with its number and length, flow and return to the manifold, and a legend.
8. Length
Water and heating run in the floor, ducts and cables via the ceiling. The length of each pipe counts the parts up or down to each symbol at the ends.
Shortcuts
- Esc
- Stop, then Select, then let go
- ⌘Z
- Undo
On Windows and Linux, use Ctrl where the Mac has ⌘.
Messages you may see
- Place a water meter or water heater first.
- Cold water laid. There is no water heater or boiler, so no hot water.
- Place a soil stack first; drains run to it.
- Place a manifold on this level; the circuits run to it.