Draw walls click by click, or drag or type the size of a room. The area shows as soon as a room is closed.

Draw your first room: step by step
1. Draw walls
Press W, or choose Wall in the toolbar. Click where the first corner goes, then each next corner. Click the first corner again to close the room, or press Enter or double-click to stop.
2. Type an exact length
After a click, move the mouse the way the wall goes, type a length like 12'6" or 3,20 and press Enter. In open space or from a corner the field says Length centre to centre: the wall is exactly that long, middle to middle. From partway along a wall it says Inside length: the size counts from the wall face, so 1.50 leaves exactly 1.50 m free.
3. Distance to the next wall
With Wall chosen, rest the pointer on an existing wall: two dimensions along that wall show how much room is left to the next wall on each side, wall face to wall face, with the thickness of the new wall already taken off. Type a number to put the point at exactly that distance. Tab switches side (the field says Gap left or Gap right, or above and below), Enter places the point and Esc clears the number. At the end of a wall, Tab first goes from the length to the distances. On a phone you see the distances while you drag.
4. Let the editor help you aim
Near a corner or the middle of a wall a snap label shows before you click. In line with another corner a guide line shows. Hold Alt while you draw to switch snapping off, except to the grid. A corner always catches within 2″ (5 cm), even when you zoom in far, and a finger gets a wider catch than a mouse.
5. Typed lengths that almost meet
When the last wall ends less than 2″ (5 cm) from a corner or a wall, the editor joins them and says Joined a gap of … Undo opens the gap again and keeps the wall.
6. Or drag a room
Press R, or choose Room. Drag a rectangle, or type two sizes like 14 x 12 and press Enter. The room gets four walls and its area in the middle. Sides that face outside become exterior walls, sides inside the home interior walls; dragging a corner later keeps the kind and thickness of each wall.
7. Typed sizes are inside sizes
The field says Inside size w × d. Type 12 x 14 and the room is exactly 12 x 14, measured from wall to wall: 168 sq ft, the same number as on squaremetry.com. The walls go around it. A rectangle you drag follows the middle of the walls. While you drag, the width, depth and area show the inside of the room you get. Type a size while the pointer is not on the drawing, and the room comes beside the drawing.
8. Thickness and height while you draw
With Wall or Room chosen, its card opens on the right, where the card of a chosen wall or room also stands. Wall shows the Thickness of the next wall, the Height and the Height above floor; Room shows the Exterior wall and Interior wall thickness apart, and the Height. Use − and + to step by 1 cm or 1 inch, or type a size and press Enter. It applies to what you draw next and stays your default, the same as Exterior wall, Interior wall and Ceiling height in Settings, My defaults. A Height that the door or window of your defaults does not fit under is not kept; one line in the card says why. Height above floor is only for now: a wall above the floor does not divide rooms. Typing in the card never starts a tool.
9. Interior wall or exterior wall
The Wall card has two small buttons: Interior wall and Exterior wall. The wall you draw gets the thickness of the chosen kind, and the button stays lit while you draw. Your choice stays until you switch, also after a reload: the editor never switches by itself. An empty plan starts with Exterior wall. Switch in the middle of a run of walls and the next wall follows. In the panel of a chosen wall the same two buttons change that wall; load-bearing, party wall, half wall and railing are under More wall types. With the keyboard, the arrow keys switch between the two. On a phone there is no card: while you draw with Wall, the two buttons stand above the toolbar.
10. Split a room with a wall
Draw a wall from one wall to the opposite wall, through a room: the room becomes two rooms, each with its own area. A click in the dark face of a wall, or just next to it, lands on its middle line, and the new wall stays square to the wall you start from, so the sizes on both sides match. Hold Shift to draw at an angle on purpose. The larger part keeps the name and type; the smaller part gets the same name with a 2, like Kitchen 2. One undo takes the wall and the split back. Delete the wall and the two rooms are one again, with the name of the larger. The overview in the panel and the small picture on the variants button show every wall right away.
11. A wall that does not connect
A wall that stops just short of another wall gets one warning on the plan, like Wall does not connect · 4 cm short, with a button Connect that pulls the end onto that wall. Until then the room is not closed and does not count: Area says so above the total. A plan that closes everywhere gets no warning. Under the total, Area also shows the rooms added up and what the walls add when the standard counts them, so the total always adds up.
12. Fix a mistake
While you draw, Backspace removes the last wall and Esc stops the walls; press Esc again to go back to Select. ⌘Z undoes a step and ⇧⌘Z redoes it.
13. Or start from a calculator
The converters on squaremetry.com, like square meters to square feet, have a button Draw this area as a room. It opens the editor with a square room of exactly that area, inside the walls. Draw this lot, on the pages for acres and hectares, draws the lot as a dashed outline that does not count as floor area. A plan that already has rooms is never changed from a link. From 1,000 uses, a small line below the calculator result shows its total, rounded down. One use is the first valid result with changed input in a page visit; the example does not count. Open the information button for the explanation. Counting uses no cookies and respects Do Not Track and Global Privacy Control.
Parts on the screen
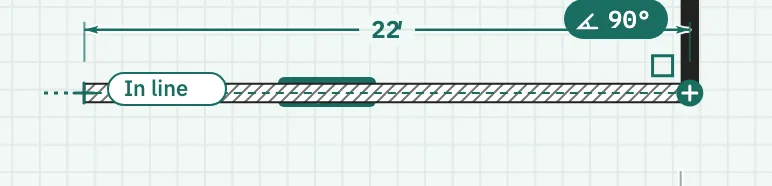
Wall you are drawing. The length in a pill, the angle, a snap label like In line, and what the next click does.

Toolbar. Every tool with its key. The chosen tool shows its name. The editor you are in is at the top left.
Shortcuts
- W
- Wall
- R
- Room
- ↵
- Confirm a typed size
- Esc
- Stop, then Select, then let go
- ⌘Z
- Undo
- ⇧⌘Z
- Redo
On Windows and Linux, use Ctrl where the Mac has ⌘.
Messages you may see
- Too short: keep going to make a wall.
- Walls can’t overlap. Snap to its end to make it longer.
- Too small for a room. Drag a larger rectangle.
- Type two sizes, like 14 x 12.
- Joined a gap of 1″. Undo opens it again.
- Room ready: 538.2 sq ft inside the walls, the same as on the calculator. Keep drawing, or change a wall.
- Lot outline ready: 43,560 sq ft. It is a dashed line and does not count as floor area. Draw your house inside it.
- Thickness (exterior wall) must be between 2″ and 39.4″.
- The pointer was not on the drawing, so the room is beside it. Drag it into place, or point at the drawing first.