Select a wall to change its kind, thickness or height. Drag a corner or a whole wall, and the rooms stay closed.
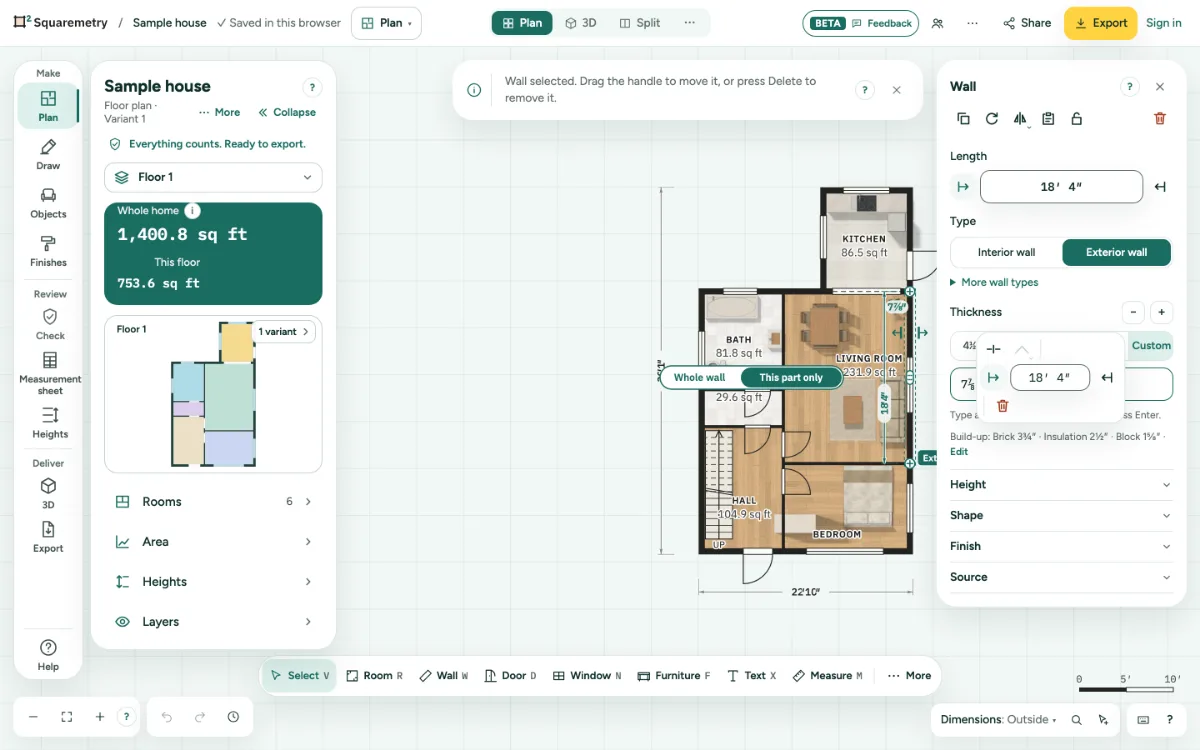
Select, move and change walls: step by step
1. Select a wall
Press V, or choose Select, and click a wall. The Wall card opens on the right. Handles show at both ends and a size label in the middle.
2. Drag a corner or a wall
Move the mouse onto a corner, also of a slanted wall or a curve: a round handle shows. Drag it to move the corner; the joined walls and the rooms follow. It snaps to the grid and to other corners; hold Shift to keep a wall at 0, 45 or 90 degrees. Drag the size label to move the whole wall at a right angle. It snaps onto walls in line. Doors and windows in the joined walls stay where they are in the room.
3. Nudge with the arrow keys
With a wall selected and the plan in focus, each arrow key (←↑→↓) moves it 1 cm or ¼ in at a right angle; hold Shift for 10 cm or 1 in. The joined walls and what stands against it go along, as when you drag. An arrow along the wall does nothing and says why. The same keys move a door or window along its wall, and furniture, symbols and text. Taps in a row are one step: one ⌘Z puts them all back, and the history says how far, like Wall moved 3 cm.
4. Scroll on a handle
With one wall selected, put the mouse on its thickness arrow (or the number next to it) and scroll: each click of the mouse wheel makes the wall 1 cm or ½ in thicker or thinner; hold Shift for 10 cm or 5 in. Scroll up for the direction of the arrow. On a trackpad a normal swipe is a few centimeters. A fast-spinning wheel counts at most about 8 steps a second, and the coasting after you let go does not count. On the handle in the middle of the wall, scrolling moves the wall at a right angle in the same steps (up moves it up, or to the right). A focused size field, like Height, steps the same way. A run of scrolling is one step: one ⌘Z puts it back. Anywhere else, scrolling zooms or moves the plan as before.
5. Move a room on purpose
Dragging inside a room moves the view, not the room. Click the room, then the Move icon (four arrows) at the top of its panel on the left, next to the lock: drag it, or use the arrow keys (Shift for bigger steps). ⌘← ⌘→ turns it 5° around its middle (with Shift 15°) and Q a quarter turn, with everything inside. Enter or Done keeps it, Esc or Cancel puts it back; nothing else ends the move. Sliding over another room never changes that room. Or drag the small handle next to its name. It snaps onto other walls.
6. Whole wall or this part only
When another wall joins this wall partway along (a T, or a crossing), a click selects just the piece between the joins where you click, and a small switch shows: Whole wall or This part only. Whole wall selects the full straight wall, through the joins. This part only goes back to the piece you clicked. A click right on a join selects the whole wall. The dashed outline, the label, the length, the thickness arrows, the corner points and the panel on the right all follow what is selected: make the piece thicker, change its kind or type its length, and only the piece changes. Moving the piece adds short walls of the same kind and thickness so the rooms stay closed. Doors and windows in that piece go with it. Hold Alt (Option) while you drag for the other choice. On a phone, tap the choice first, then drag. Drag the piece back in line and it is one wall again.
7. Type the length, or lock it
In the Wall card, type a Length in feet and inches or meters, like 15' 6" or 3.80 m, and press Enter. Or click the size label on the plan to jump to that field. Choose which side stays: Left or top stays, Right or bottom stays, or Both sides. Each choice shows a small picture and one sentence of what happens. Set your default in Settings, My defaults; a choice on a card holds until you close the editor. A wall standing at a right angle on the end that moves goes along, so the room stays square. Doors and windows keep their place from the side that stays. Lock size keeps the length: other changes move the wall as a whole, or do not go through. In the small bar next to the wall, the arrows on both sides of the length are two anchors: one pressed keeps that end in place, both pressed makes the wall longer or shorter on both sides and the middle stays. The length is the inside length, wall face to wall face on the side of the room; the plan shows the inside and the outside length. If a door or window would no longer fit, or would overlap another, nothing changes and one sentence says why. When a locked size makes joined walls move along, one sentence says so and those walls glow briefly. A locked length is the inside length too: a joined facade that gets thicker does not change it.
8. Double-click a size on the plan
Double-click the number of a dimension on the plan: the outside size, a part of a dimension chain, or the inside size under the name of a room. A small field opens there. Type the new size, like 13' 4" or 13.5' or 3.80 m, and press Enter; Esc cancels. Everything past the wall at that end of the size moves, and the side that stays follows your choice. An inside size of a rectangular room changes just that room, like typing its Width or Depth. On a phone, double-tap. If a size cannot work, one sentence says why and nothing changes.
9. Furniture goes along
Move a room, a selection or the whole floor and everything inside goes along: furniture, kitchens, symbols, pipes and cables, notes, dimensions and photo points. Move one wall, also just a part or by typing a size, and what stands against it moves with it: a kitchen run, a cabinet, a radiator, a socket or a switch. A cable on such a symbol follows its end. Furniture only moves along if it still fits in the room afterwards, with nothing in its way; otherwise it stays exactly where it was, never squeezed or resized. Free-standing furniture stays; if the wall would run through it, it shifts back just enough, if there is room. Turn or mirror the plan and the furniture turns too. One ⌘Z puts it all back. Furniture on a locked layer stays where it is, with one short message how many items stayed. A locked Construction layer means walls and rooms do not move at all. Shapes you made in Model go along in the same way.
10. Kind, thickness and height
In the Wall card, pick Interior wall or Exterior wall with the two buttons under Type; load-bearing, party wall, half wall and railing are under More wall types. Then a thickness or Custom, and the Height. When the thickness changes, the wall keeps its sensible side: in feet and inches the outside stays and the wall grows inward; in metric the inside stays, so your rooms keep their size.
11. Split, corner, arc or bay
Select a wall and a small bar shows next to it. Click Split, or Corner or bay and then Corner; Arc, Square bay and Angled bay are under More. A dashed line now follows the mouse along the wall, with the distance to both ends. It catches the middle, the ends, the thirds and the line of corners, doors and windows nearby. Click to place it, or type a distance from the underlined side and press Enter. Tab switches to the other side, then width and depth. Esc stops. On a touch screen, drag along the wall, let go and tap Place. One ⌘Z takes it away. Split works on a curved wall too: the distance runs along the curve, and both parts keep the same curve.
12. Cancel, undo or delete
Press Esc while you drag to put everything back. ⌘Z undoes a finished drag. Press ⌫ to remove the selected wall, or click Delete wall at the bottom of its card. You see Wall deleted. Undo brings it back. If a door or window goes along, or two rooms become one, the line says so, like Wall deleted, with 1 door. Bedroom is now part of Living room. Undo brings it all back.
Parts on the screen
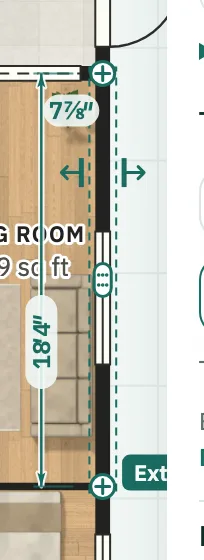
Wall handles. Round handles at the ends move a corner. The size label in the middle moves the whole wall. Arrows at a door set its width.
Shortcuts
- V
- Select
- ←↑→↓
- Move what is chosen a little (1 cm or ¼ in)
- ⇧←↑→↓
- Move what is chosen further (10 cm or 1 in)
- ⌘← ⌘→
- Turn what is chosen 5°
- Q
- Turn 90°, or flip a chosen door or window
- ⌫
- Delete what is chosen
- Esc
- Stop, then Select, then let go
On Windows and Linux, use Ctrl where the Mac has ⌘.
Messages you may see
- A door or window would no longer fit on the wall. Nothing changed. Move or remove it first.
- A door or window no longer fit on the wall and was removed. Undo puts it back.
- Size fixed. Walls joined to it move along, also at an angle.
- The fixed size stayed; 1 wall moved along.
- This size is locked. Unlock it first, or move it as a whole.
- A curved wall gets its length from its curve. Straighten it first, or change the curve.
- Wall split in two. Drag the new corner to shape it.
- A door or window is in the middle of this wall. Move it first.
- Type a thickness between 2 cm and 120 cm, like 30 cm.
- A wall moves square to itself. Use the other arrow keys.
- To move a room, choose Move in its panel first.
- To turn a room, choose Move in its panel first.
- Not on an end of the wall. Choose a spot in between.
- A door or window is in the way here. Choose another spot.